Selasa, 30 Agustus 2011

DIY :: Glass Magnets

I'm kind of on a magnet kick right now. I found a bag of 30 of these glass gems at the Dollar Tree for, yes, $1.00. My 1" paper punch cut out the perfect-sized circles to use for these. So a little bit of Mod Podge and a magnet later, I had more super cute magnets to add to the refrig.
 
Like the other magnets I shared last week- these are really easy and inexpensive to make. I printed out some pictures in tiny proportions, then found some words in a vintage dictionary I wanted to use (family, love, loving), as well as some vintage sheet music words and music- the glass magnifies the words- super cool. I used the 1" paper punch, but you could easily trace around the glass gems onto the paper you want to cut out and free hand cut it.
Supplies:
- Glass gems - about 1" or 1.25" wide (you can find these at any craft store, or the Dollar Tree)
- Pictures or vintage images/words
- Mod Podge
- Magnet backing
- Foam brush (that I had already started using in the picture above. Ha.)
- Scissors (if you cut around the images free hand)
Simply brush a light coat of Mod Podge on the back of the glass gem and then adhere the picture/image. Press down and gently rub the image to get all of the air bubbles out. Let fully dry. The glue will dry clear.
Cut a small piece of magnet and adhere to the back.  Voila! A fun and personal magnet you can use on your refrig, or give to someone else as a gift :)


Jumat, 26 Agustus 2011

New in Shop :: Bits and Pieces Scrap Packs

These Bits and Pieces Scrap Packs are now in the shopThese are scrap packs chock full of bits and pieces, perfect for arts and crafts projects - scrapbooking, cardmaking, collages, adding whimsy to a journal, etc. Packs include 35+ pieces including items such as scrap fabric, papers, buttons, ribbon, labels, confetti, clothespins, paper rounds, pins, felt, rubber stamps. stickers and much more. Each assortment is packed in a resealable clear cello bag: approx. 4.75"x6". Each pack is different and is sure to make you smile. 


Rabu, 24 Agustus 2011

around here.


Around here. We had a mild earthquake yesterday around 1:51pm. 5.8 magnitude, with the epicenter  up in Central Virginia, right where we lived before moving here. Wow. Thankful all are ok.

- I've been rounding up my art journals and getting them all put together on the shelf over my craft table. Love having them at arm's reach to look through from time to time. Great for jogging my memory about a particular event or trip. *Edited to add: The journal rings can be purchased at an office supply store or on amazon here.

- I've been working on my breadmaking. Using the bread machine a lot, but also trying to perfect a "made-by-hand" loaf using Beard on Bread.

- I am about to put some mini-flashcards in the shop - three different sets. Autumn, School and Winter. Will have them listed by the end of this week.

- My sweet Joshua is a little over 6 months old now and cute as can be. Yes, that is a dimple on his right cheek (he has a small one on his left cheek also). Love.

- Jimmy and I put together a paper chain to count down the days till we go to the beach in September. All he can talk about now is taking a link off each day. He then asks if we can take 2 or 3 links off... at the same time. And how that will mean we can go to the beach as soon as we take off all of the links. Love.

- Tons of green peppers coming in in the garden. This one was my largest one yet. Smelled so yummy.

Selasa, 23 Agustus 2011

DIY :: Tile Magnets

I purchased a tile magnet at a craft show I was in a couple years ago. It had a lovely image of vintage flowers somehow transfered onto it. Unfortunately, it fell off the refrig one too many times and now sits in a basket on my desk in about a million pieces (I can't bear to throw it out). I decided to start hunting for a tutorial on how to transfer images to basic bathroom tiles and couldn't really find anything that didn't require purchasing a type of chemical/adhesive help I did not already have. So I tried just using ModPodge and it was a fail. An epic fail. Half of the image transferred, and then peeled right off. So I thought I would try to ModPodge the printed images straight to the tiles. 
I decided to just go with it and start using different materials to see what would work and look best - I used the printed images from herehere and here, vintage sheets and clothing I found at a thrift store, and washi tape, and all three turned out great. I also found sheets of magnetic material at the thrift store (random, right?!).


These little magnets are super cute, super inexpensive to make, and of course, super fun to make. I purchased a sheet of 2"x2" tiles (they come in sheets of 36, glued together for about $3.25) from a home improvement store and then broke them apart at the glue (*edited: they come apart fairly easily by bending them back and forth at the glue) and trimmed off the excess glue with an x-acto knife. 


Materials:
- 2"x2" bathroom tiles
- ModPodge and foam brush
- Magnets (you can buy this on a roll, usually at craft stores)
- Glue (super strong, for adhering the magnet - I recommend Gorilla Glue)
You can use any of these (or all of them!)
- Fave papers, cut down to 2"x2"
- Fabric (either new or repurposed clothing, sheets, etc. I recommend using a fairly light-weight fabric, so that the ModPodge will hold it - ie. no upholstery)
- Washi tape
If you are using Washi tape, you can directly adhere it right onto the tile in a fun pattern, glue on a magnet and call it finished.


If you are using paper or fabric: Using the foam brush, apply a thin layer of ModPodge over the top of the tile. Adhere the 2"x2" piece of paper or fabric and gently smooth out any air bubbles. Apply another thin layer of ModPodge over the paper or fabric and around the edges of the tile to smooth out - this will ensure there are no edges of paper or fabric hanging off of the tile. Let dry completely.

Then glue a magnet onto the back, and voila! A fun magnet to add some lovely to your refrig. You could also print out letters, a quote or Scripture and adhere that to the tile. What an easy, inexpensive, but thoughtful gift! :)


Senin, 22 Agustus 2011

deep breath.

Today marks the first day of the Fall semester for my hubby. The last Fall semester of his master's degree program. Our 4th Fall semester. Our 7th semester (the start of our 4th year) here in Wake Forest, North Carolina.


I know it's not technically Fall/Autumn yet, and it won't be for several more weeks- not trying to rush things, as we are definitely soaking up every last bit of the end of the summer. But things are getting into gear and well, it just feels like fall is nearly here. Lots of meetings to attend, school starting, etc. I love this time of year. I love getting into a new rhythm with my sweet family as school starts again and getting ready for the end of the year and the holidays (It's almost Christmas!?). I am also excited for some relief from the record-high temperatures this summer :)


Lots going on this semester. Last semester was crazy, but this semester is shaping up to be crazy also. Lots of travel going on in the next several months (mostly my hubby), including out of the country, to the other side of the country, down south, and to visit family. Looking forward to documenting some of our travels and sharing them here.


Time has absolutely flown by this year, and continues to. I have so many ideas for the shop, just have not had time to execute and develop them. Hoping to map out a plan for the next couple months, including possibly doing this craft show again. Still up for debate.


I am working on an Autumn-type journal that will be in the shop soon. Am trying to decide if I will be keeping one or if I will just make different journals for our travels. Also still up for debate.


So that's the next couple of months in a nutshell. Taking a deep breath. Ready to get started. Let's go! :)

Senin, 15 Agustus 2011

Canning: Roasted Garlic Pasta Sauce

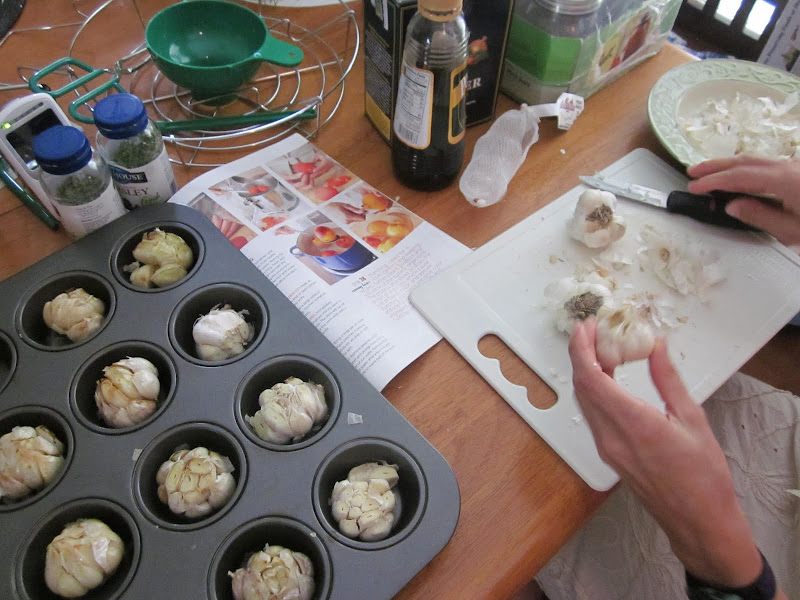
Some of my friends and I canned Roasted Garlic Pasta Sauce this weekend. It was a great time of roasting garlic, chopping tons of tomatoes and basil, using 25 (not really :)) different pots and colanders to get the job done (tons of tomatoes + not enough large pots = hilarious-ness in the kitchen), lots of laughs, some pizza and cokes. Six (yes, 6) hours later, we had 13 lovely pints of Roasted Garlic Pasta Sauce. We were proud that it only (haha) took 6 hours - none of us had canned before, besides jam. We used a recipe out of a special issue of Better Homes and Gardens - the recipe is located here - just add the garlic from 6 bulbs of roasted garlic to the tomatoes as you chop them in the food processor.


I think I am now addicted to canning. What fun it was to use super fresh produce (a lot from my backyard!) to create pasta sauce that can sit in the pantry. I spoke with one of my friends that was here canning with us and we were talking about how we seriously want to open up a jar and eat it now (we all tasted some last night, SO good), but it's so fun to just look at the cans of homemade tomato sauce that we all put time and effort into.


We are already planning on canning up some apple butter (maybe also peach butter before the season is finished?) as autumn approaches :)


Jumat, 12 Agustus 2011

Garden: At the Moment

Our little garden is producing tons of tomatoes, roma tomatoes, peppers, and jalapenos at the moment. If you go here, you can see the progression of the growth in the garden. The squash and zucchini plants are flowering and have begun to crawl out of the planter box (so has one of the pepper plants). It's hilarious. :) Some of my friends and I are getting together this weekend to use some of the tomatoes and can some Roasted Garlic Pasta Sauce - should be a fun time! :) Have a fabulous weekend :)

Kamis, 11 Agustus 2011

on my desk.

Currently working on a blog re-design. Jotting and drawing ideas. Working off of a test blog. Hope to have it up and running in the next couple weeks. Am excited to finally switch to a 3 column layout. :)


Selasa, 09 Agustus 2011

Food: Lemon Loaf

I love pinterest. I found this Lemon Loaf recipe over at the fabulous food blog, Glorious Treats several weeks ago and just had to try it out. I made several modifications to the recipe - which can be good or bad - but I am super excited with how it turned out. Perfectly lemony, and perfectly wonderful for summer.
Lemon Loaf - Makes 2 loaves 9"x5"
Lemon Cake:
3 cups all purpose flour
1/4 cup cornstarch
2 teaspoons baking powder
1/4 teaspoon baking soda
1 teaspoon salt
2 1/4 cups sugar
8 large eggs
2 Tbsp. grated lemon zest (from about 2 lemons)
1/4 cup fresh lemon juice
1.5 cups (3 sticks) unsalted butter, melted and cooled
1/2 cup sour cream, at room temperature
2 teaspoons pure vanilla extract

Lemon Glaze
2 cups confectioners' sugar
4-6 Tablespoons fresh lemon juice

Preheat oven to 350 degrees F. Spray sides and bottom of pans with cooking spray.
Whisk together flour, cornstarch, baking powder, baking soda and salt together in a medium bowl.

Blend the sugar, eggs, lemon zest and lemon juice in large bowl and mix well. Slowly add the melted butter, while mixing. Add sour cream and vanilla and mix until just combined. Slowly add the flour mixture a little at a time, do not over mix!

Divide the batter evenly between the prepared pans. Bake in the center of the oven for 20 minutes, rotate the pans, reduce the oven temperature to 325 degrees F and bake another 30-35 minutes, or until toothpick inserted in the center of the loaf comes out clean. Let cool in the pans for 15 minutes.

Make the Lemon Glaze:
In a small bowl, whisk together the confectioners' sugar and 4 tablespoons of lemon juice. The mixture should be thick but pourable. If the mixture is too stiff, add up to another 2 tablespoons lemon juice (a little at a time) and whisk again. Pour the glaze over the top of each loaf and let it drip down the sides. Let the lemon glaze harden, about 15 minutes, before serving. The glazed loaves will keep for up to 3 days, wrapped well in plastic wrap, at room temperature.


**The original recipe calls for lemon syrup. I made lemon syrup the first time and felt like the loaves were too moist for my taste. So I left it out the next time. If you are interested in covering the loaves with syrup:
Lemon Syrup
1/4 cup fresh lemon juice
1/4 cup sugar
Make the syrup while the loaves are baking. In a small saucepan over medium heat, heat the lemon juice and sugar until the sugar is completely dissolved. Once dissolved, continue to cook for 3 more minutes. Remove from heat and set aside.


Invert the baked and (mostly) cooled loaves onto a large sheet pan. Use a toothpick to poke holes in the tops and sides of the loaves.

Brush the tops and sides of the loaves with the lemon syrup. Let the syrup soak into the cake and brush again. Let the cakes cool completely, at least 30 minutes.
(The soaked, but unglazed loaves will keep well, wrapped in two layers of plastic wrap and frozen, for up to 6 weeks.)

Recipe adapted from Glorious Treats, originally found in Baked: New Frontiers in Baking

Jumat, 05 Agustus 2011

LINK with Love

Have you heard about LINK with Love? I am loving this movement. It is all about "Linking with Love" - giving credit where credit is due. Sadly, I have seen some of my tutorials completely lifted (pictures and text) with no credit given. I am always happy to share my content and pictures-- just ask, or give a link back :)

From the LINK with Love website: "It is our goal to inspire positive change in the way art, photography, design, words, music, film and ideas are shared on the internet. We believe that intellectual property needs to be handled with love and respect. We believe in the goodness of people. We believe in the power of the internet. We believe that Maya Angelou was absolutely right when she said "when you know better you do better."

We need your help. We need your support. Learn more. Spread the word. Post our badge on your sites to show that you LINK with love."

Kamis, 04 Agustus 2011

Confetti Windows :: New in Shop

So, remember the intro to my December Daily last December? I had tons and tons of Christmas-color hole punches from punching journals and wanted to incorporate them into my journal. I love, love, love how it turned out - I have not ever seen anything like them (after searching all over the www) and recently decided to make more - and they are now available in the shop. Custom sizes and color combos are also available.

These super colorful "windows" are perfect to add texture and whimsy to your art journals, mini albums or scrapbooking pages. The confetti moves freely in the window, so it is always changing the look of the page. The paper punches include vintage papers, new papers, old magazines, scrapbooking papers. All punches are from leftover scraps of paper - so they are being "recycled" into this fabulous confetti!

The windows come with no holes punched in the side, so you can punch them to fit in your journal or use clear adhesive to adhere to a page. They are completely transparent, so you can see bits and pieces of the image or page underneath.

Rabu, 03 Agustus 2011

Selasa, 02 Agustus 2011

Food: Fresh Pesto

My affection for pesto began several years ago when one of my sweet friends brought me real Italian pesto - all the way from Italy. I've bought it in the store before. It's pretty good. But I knew I had to try making my own someday. So I did last week. It was amazing. My hubby and I were talking the other day about "Why have we not had a garden and also grown fresh herbs every summer before now?!" My basil plants are still out of control and I can't keep up with keeping them harvested. So, I found a recipe in my canning magazine for pesto - perfect to use up all of this amazing basil.

I changed it up a little bit, added extra freshly-grated parmesan and used walnuts instead of pine nuts. I also cut the recipe in half so I wouldn't use all of my basil at one time (I know, I said I needed to use it, but the idea of completely using up all of it at once...). You can freeze this yummy-ness for up to 3 months. Perfect to take the summer taste into the fall months.

Homemade Fresh Pesto (adapted from Better Homes and Gardens Canning Magazine)
1-1/2 cups firmly packed fresh basil leaves
1/3 cup walnuts
2/3 cup fresh grated parmesan cheese
1/4 cup extra virgin olive oil
3 cloves garlic
1/4 tsp. salt
1/8 tsp. ground black pepper

In a food processor, combine all ingredients and pulse until nearly smooth. Stop and scrape the sides as necessary.

Place in airtight container and store in refrigerator for up to two days.

I planned on using mine right away or freezing it. You can place 2 Tbsp. in a ice cube tray and freeze them. Then place in a freezer safe container and you have individual portions ready to go :)


Senin, 01 Agustus 2011

Faves: Labels

So I have to admit. I am obsessed with labels. I love them. There is SO much you can do with them. Of course, use them in art journals, mini albums, use them to make a greeting card, or to address an envelope. Dress up a flower pot with writing what it is on the label, or writing an encouraging word or Scripture. Label your notebooks or books. Not to sound cliché, but the possibilities really are endless ;)

I did a little search on etsy and found all of these lovelies. Vintage (Dennison!) labels, new labels, fabric labels, masking tape labels. These were a few of my faves. Check out my favorites in my etsy shop for some more, including some rubber stamps of labels. I recently ordered and received this one and this one and love them.

Any other ideas on how to use labels? :)
1. Cotton Label Sewing Tape from sugarbsupplies
3. Etiquettes Label Stickers from WonderlandRoom
4. Red Border Label Stickers from WonderlandRoom
5. Beautiful Border Labels from littlehappythings1
7. Frame Label Adhesive Masking Tape from WonderlandRoom
8. Red Border Index Stickers from WonderlandRoom