Selasa, 29 Maret 2011

DIY Tuesday :: 3D Spring Flowers Card

So in honor of Spring beginning, Easter and Mother's Day coming, I decided to make a card with paper flowers - new paper and found papers. It is similar to the idea behind this tutorial I shared for Valentine's Day. I originally started out with two paper rounds for each flower but decided to add a third and small paper round for the "center" of the flower. I am so super happy with how this turned out- I'm thinking about making a few and selling a set in the shop. We'll see. :)
Want to make your own? These are perfect to send as a Spring greeting, a "Happy Easter" or to a special mama or grandmama for Mother's Day.

I used cardstock for the base of the card and cut an 8.5"x11" sheet in half to get a 4.25"x5.5" folded notecard. I used a cream colored piece of cardstock for the background, but you could also cut up an old manilla folder to use!

For the "flowers" you can use a paper punch or scissors, and cut from various types of paper - old books, security envelopes, old magazines, etc. I used scrapbooking paper, old dictionary paper, sewing pattern paper, vintage sheet music and a vintage map page.

Supplies:
+ Blank white notecard (folded size: 4.25"x5.5")
+ Background cardstock (3.75"x5")
+ Six 1.5" paper circles, cut or punched from various papers
+ Three 1" paper circles
+ Green ribbon - cut into stems and leaves
+ Permanent rolling adhesive
+ Sewing machine and thread (you could also probably just use adhesive if you don't have a sewing machine)
+ Scissors
Position the ribbon and three of the paper circles on the cream background paper to your liking. Using the rolling adhesive, adhere the leaves, then the stems, then the paper circles. I had two of my paper circles hanging off the edge a little, because I thought it looked fun :)
Next, position another 1.5" circle on top of an already adhered circle, and then the 1" circle on top of that - centered. Sew down the middle. Repeat for the other two flowers.
Circles all sewn on - trim the excess thread off. Now adhere the cream background to the white notecard, centered.
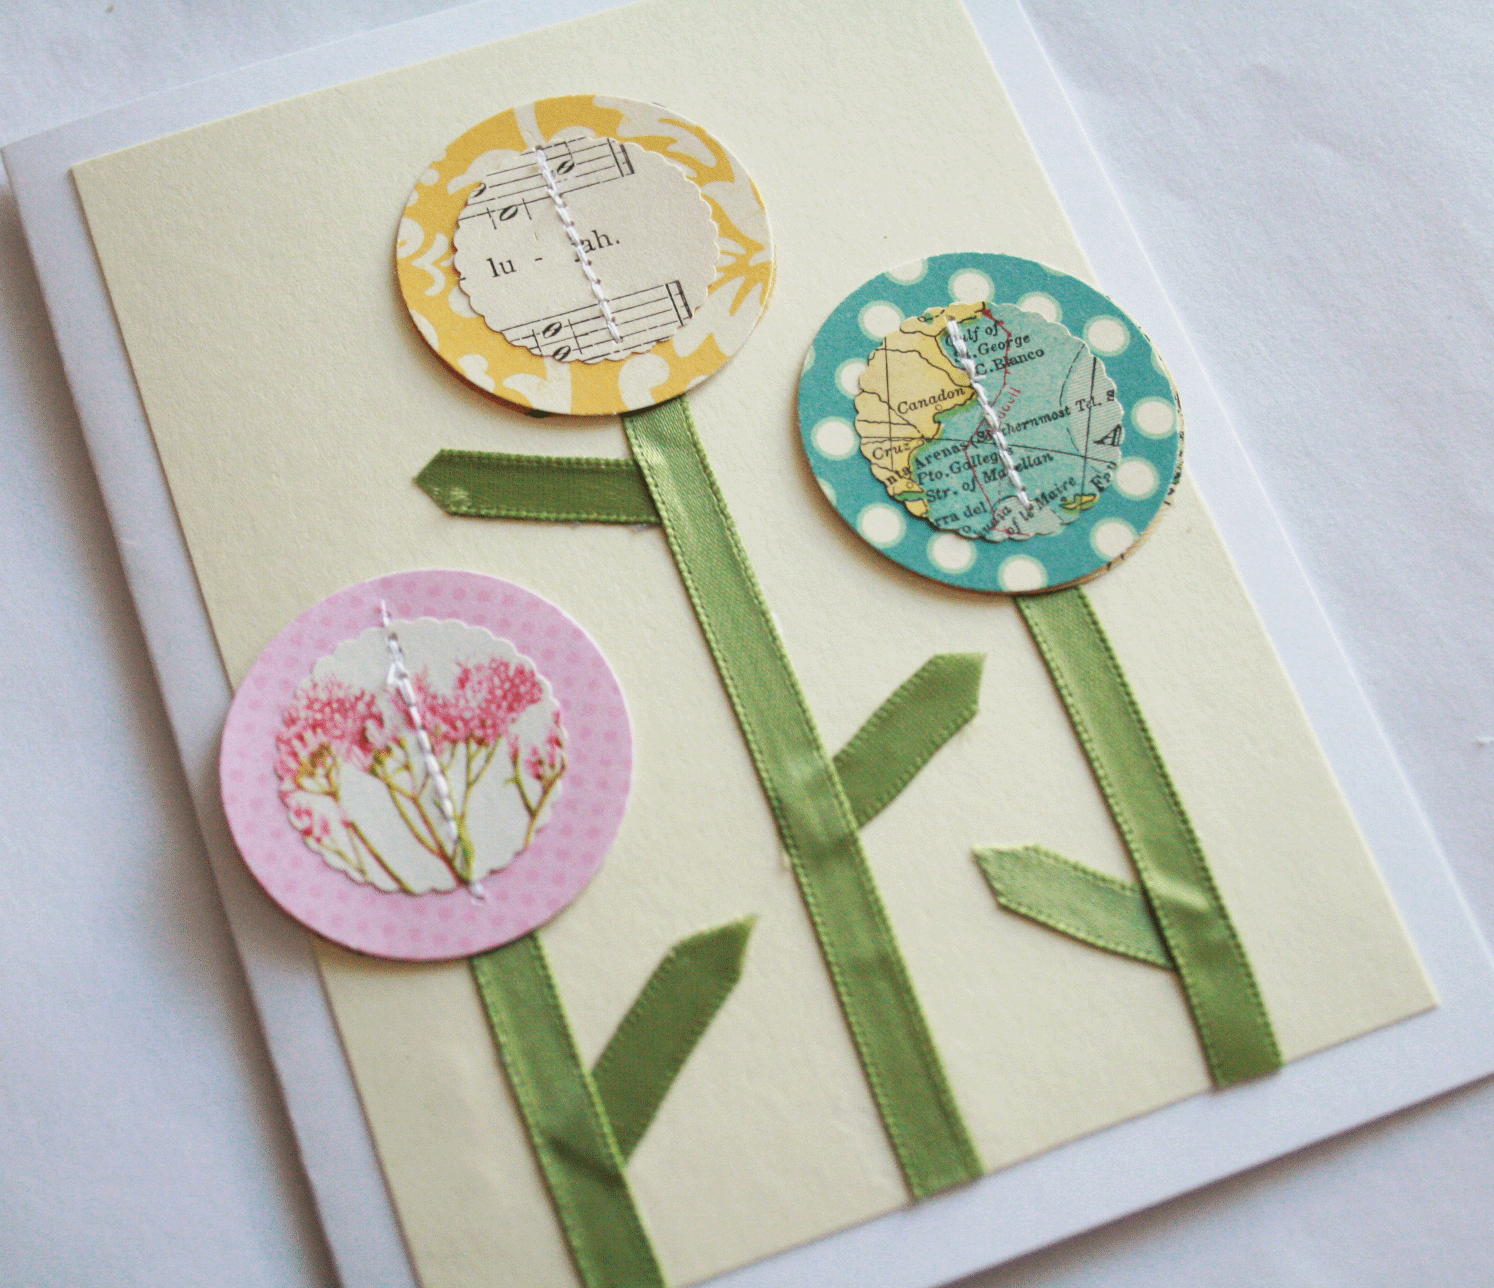
Fold up each "petal" on the flower to create a 3D effect.
Voila! A super cute card to send to a special someone. Send or give in a vellum envelope (like below!) and it's sure to create a lot of smiles :)

Jumat, 25 Maret 2011

DIY Party Favor :: Guest Post

Hi all! I'm Cecelia from Crafting Creatures! As a graphic designer, I often get asked advice on the printed items of weddings and special occasions. I made this wedge shaped tetra-pak party favor for my own wedding because it uses minimal paper and cutting, yet provides maximum volume for holding items, and allows for your message on top. After stumbling on DIY blogs, I found myself inspired to show how it's made – I hope it helps make your special day. Go here to see the how-to!

Rabu, 23 Maret 2011

I love my Mac.

My new MacBook Pro came yesterday. It is absolutely fabulous. I have a lot of learning to do. Like, I couldn't figure out how to import this picture off of my camera ;) (My hubby wasn't home and he knows way more about this stuff than I do!) Thankful for Facebook and asking who knew how to do that and having a response super quick :)
My poor sweet baby son has colic really bad (went to the doctor yesterday for the second time in 10 days). We have several remedies we are now trying, hoping my sweet boy has some relief soon.

So, a little behind on the shop update and the blog. Will hopefully be back into the swing of things soon.

Senin, 21 Maret 2011

Growing Seeds.

Remember how we planted seeds about a week ago? Well, we already have some HUGE seedlings (those tall things are bean plants). It has been so fun to watch them grow and I swear the beans grow about a ½" a day. We are getting ready to transplant them to cans with sticks (so they can climb) because it is still much too cold at night to transplant them to the outside.
My awesome hubby made a huge planter box to fit up next to our home (the only place on our entire property that receives enough sunlight - we have tons of trees!) this weekend. We can't wait for the seedlings to get big enough (and for it to get warm enough) to transplant them outside. Yay for fresh produce on the horizon. That is, unless I accidentally kill the plants before they can produce fruit ;) Hopefully not.

Jumat, 18 Maret 2011

Good Things.

Working on a few art journals for the shop. Waiting for a few more ingredients like envelopes to arrive :) Super excited about these, they will probably be in the shop early-mid next week.
+ Extremely honored to be on Babble's Top 50 Mom Craft Blogs. Go here to see a little more about The Creative Place and here to see amazing and inspiring blogs - all by mamas. Thank you Babble! What an honor :)

+ My hubby and I just ordered me a new MacBook Pro. I am nothing short of giddy waiting for it to arrive and begin learning and working on it. I have been on a PC all of these years and we finally decided to purchase me a Mac - my current computer is almost 10, yes 10, years old... it has done me well but it's time to move on :)

+ Be on the lookout for more fun guest posts next week along with a giveaway. Have a fabulous weekend!

Kamis, 17 Maret 2011

Happy St. Patrick's Day!

Happy St. Patrick's Day! We are going to make green sugar cookies... Maybe some green popcorn?! What about you? Any fun "green" activities for today? Some fun green goodies to tickle your fancy :)

Rabu, 16 Maret 2011

Food: Apple Pie. From Scratch.

So another fabulous recipe from my America's Test Kitchen Cookbook (love this book, can you tell?) - Classic Apple Pie. So incredibly delish. So incredibly full of butter I think I'll have to wait until next year to make it again :) I adapted it slightly - making the pie crust the night before and cutting down on the butter a little bit (which didn't seem to affect it, to me), using three Braeburn and two Granny Smith apples, and using apple pie spice (I didn't have any allspice). Excellent recipe. Excellent pie. Mmmm... :)

Classic Apple Pie

Pie Crust
1/3 cup ice water, plus extra as needed
3 Tbsp. sour cream
2½ cups all-purpose flour
1 Tbsp. sugar
1 tsp. table salt
2 sticks butter (16 Tbsp.) unsalted butter, cut into 1/4 inch thick pieces and frozen for 10-15 minutes.

Mix 1/3 cup of the ice water and the sour cream in a small bowl until combined. Process the flour, sugar and salt together in a food processor until combined. Scatter the butter pieces over the top and pulse the mixture until the butter is the size of large peas, about 10 pulses.

Pour half of the sour cream mixture over the flour mixture and pulse until incorporated, about 3 pulses. repeat with the remaining sour cream mixture. Pinch the dough with your fingers; if the dough feels dry and does not hold together, sprinkle 1 to 2 Tbsp. more ice water over the mixture and pulse until the dough forms large clumps and no dry flour remains, 3 to 5 pulses.

Divide the dough into two even pieces. Turn each piece of dough onto a sheet of plastic wrap and flatten each into a 4 inch disk. Wrap each piece tightly in the plastic wrap and refrigerate for 1 hour. Before rolling the dough out, let it sit on the counter to soften slightly, about 10 minutes.
For the Pie:
2 Tbsp. all-purpose flour
3/4 cup plus 1 Tbsp. sugar
1 tsp. grated zest plus 1 Tbsp. juice from 1 lemon
1/4 tsp. table salt
1/4 tsp. ground nutmeg
1/8 tsp. ground allspice
2 lbs. McIntosh apples (about 4 large), peeled, cored and sliced 1/4 inch thick
1½ lbs. Granny Smith apples (about 3 large) peeled, cored and sliced 1/4 inch thick
1 large egg white, lightly beaten

Roll one disk of dough into a 12 inch circle on a lightly floured work surface, then fit it into a 9 inch pie plate, letting the excess dough hang over the edge; cover with plastic wrap and refrigerate for 30 minutes. Roll the other disk of dough into a 12 inch circle on a lightly floured work surface, then transfer to a parchment-lined baking sheet; cover with plastic wrap and refrigerate for 30 minutes.

Adjust an oven rack to the lowest position, place a rimmed baking sheet on the rack , and heat the oven to 500 degrees F.
Mix the flour, 3/4 cup sugar, the zest, salt, nutmeg, cinnamon and allspice together in a large bowl. Add the lemon juice and apples and toss until combined. Spread the apples with their juice into the dough lined pie plate, mounding them slightly in the middle. Loosely roll the second piece of dough around a rolling pin (see picture below) and gently unroll it over the pie. Trim, fold and crimp the edges, and cut four vent holes in the top. Brush the dough with the egg white and sprinkle with the remaining 1 tablespoon sugar.Place the pie on the heated baking sheet, reduce the oven temperature to 425 degrees, and bake until the crust is golden, about 25 minutes. Reduce the oven temperature to 375 degrees, rotate the baking sheet, and continue to bake until the juices are bubbling and the crust is deep golden brown, 30 to 35 minutes longer. Cool the pie on a wire rack to room temperature, about 4 hours. Serve.

Selasa, 15 Maret 2011

Photoscape :: Guest Post by Diane from A Spot of Whimsy

Hello Dear Creative Place Readers,

My name is Diane, and I am the author of a spot of whimsy - a lifestyle blog with a touch, or spot, of whimsy. I created this blog in April 2010 to fill a creative void in my life. I was so inspired by other bloggers and the handmade and DIY-movement that I wanted to be a part of it, sharing and creating alongside them. It has been a thrilling and educational experience, and I find myself so grateful to anyone who reads my words.

I created a post as part of my "things I heart" series, this time introducing my readers to the free photo-editing tool, photoscape. Not everyone (me included) has photoshop, and in my search to find an alternative, I stumbled upon this great download, which has not only made my photographs better, but has improved the quality of my blog posts as well. Go here to check out the post on photoscape.
Hope you enjoy reading about photoscape, and I also hope to see you over at a spot of whimsy soon!

Best wishes,
xo. di.

Senin, 14 Maret 2011

Planting Seeds

We had gorgeous weather this weekend. Am so ready for spring! unfortunately, all 4 of us (yes baby too :( not good) were sick with cold type symptoms. Bah. Saturday we all laid around in our pj's and watched movies on Netflix, had carryout for dinner and just laid low. Sunday we missed church, so as not to share our germs, but were able to get outside in the afternoon and enjoy the warm weather. We finally planted our seeds and I am super excited to see the first sprout come up. I had saved a bunch of cans to plant seeds in as well as purchased a Jiffy tray (which you can find at any garden center, hardware store, or online).
We planted all sorts of vegetables (after doing some research to see what would grow well in our climate and what would be least likely for me to kill - I'm not particularly green-thumb-ed) including carrots, lettuce, onions, snap peas, and herbs, as well as some flowers - zinnias and marigolds. I've heard it's pretty easy to grow marigolds. And did you know radishes only take 26 days to mature into ready-to-eat yummy-ness?!

I planted some roma tomatoes, but have read it is probably better (easier?) to just buy actual tomato plants (and green pepper plants) once the weather gets warmer.
So now we wait. Watch the cute little cans and jiffy tablets and wait. Once the seeds sprout and grow, we will transplant them to bigger containers and put them outside (when the warm weather is here to stay). For now, they will sit on top of the fridge where it is warm and have a "plant growing light" on them... which I still need to purchase ;).

Kamis, 10 Maret 2011

A Story to Tell: Katie from Gadanke

Hi! I'm Katie, the designer behind Gadanke. A couple of years ago, NPR's StoryCorp was in town. It was also my grandma's 90th birthday. The two of us decided to hop into the recording studio to capture some pieces of her story. I had all sorts of prompts to help her with her story telling. (I was always the listener, the one who asked question after question.) The only problem? My grandma couldn't remember. Too much time had passed. Later, my dad turned to me and said, "Katie, I need you to write down your story." I knew he wished he had his mom's stories. So I started writing. I started wondering about all of the other women who have stories deep inside of them, and I started thinking about how my tendency to just listen and ask could help put those stories onto paper. Gadanke was born with fabulous writing prompts and recycled papers. I feel so lucky to be living my dream.
+++
My grandma told me that she didn’t have a story worth telling.

My jaw dropped. I thought her story was fabulous. So one day I started asking her little questions about her life. As if a piece of her heart opened to the world, my grandma had story after story to share. I think she was shocked to discover these pieces that were still in her. They were pieces that made her who she is today at 94 years old.
Do you have a story?

I suspect you do. Your daily life is filled with little bits. Sometimes we don’t even realize how these moments in our lives shape us until we’re prompted.

If I handed you a blank page and said, “Now write your life story,” do you think you could do it? It’s a pretty overwhelming task. It’s also why blank journals can often become records of all our sadness and frustration.

Interviewing my grandma forever changed my life. Listening to her stories, I started wondering about all of the other women who have stories deep inside of them. I created an online journal and writing prompt shop, Gadanke.

It's always so fun to connect here with Ashley at The Creative Place. She knows the power of celebrating our stories, doesn't she?!
When you have a passion or a dream, write about it. Write about plans. Write lists of loves. And above all, write about you.

If you start thinking, "Well gosh, who cares about my story?", think of your mom and grandmas and all the women who came before you. Their stories matter to you; your story should, too.
You have a story that is so very worth hearing.

Ashley, thank you so very much for having me.

+++
About Katie and her shop: I'm American; my husband is German. We split our time between a 480 square foot apartment in Berlin, Germany and - get this - a house made out of hundreds of recycled tires in Montana, USA.

My journals have always documented our adventure. But we just couldn't keep it all to ourselves. (The love of fun journals, I mean. NOT the jetlag.)

As a trained writer, my goal at Gadanke is simple:I want to help you create the type of journals and memory books you'll treasure. We all have stories, and I promise. Your story is worth celebrating. So my goal is to help make your writing process more enjoyable and meaningful. That way you can really dive into the zest of life.

I'm incredibly lucky to have experienced life in Europe and the United States. It's opened my mind to so many values and perspectives on life. It's also given me the great opportunity to select beautiful journal materials. My products feature beautiful Italian patterned papers, American library cards, pockets, little sentiments, and 100% recycled German paper. I'm convinced you'll love them!

Want your own fabulous journal?! Use coupon code GETCREATIVE at checkout to receive 10% off of your purchase. Hurry! Offer expires March 17 at 5:00pm MST.

Selasa, 08 Maret 2011

DIY: Coffee Sack Bag :: A Unique Rug

Jane, of MaidenJane has been sewing since she traded her engineering job for raising kids 19 years ago. She enjoys sewing clothes and accessories for her family and friends. She opened an Etsy shop two years ago which sells "practical yet pretty" items, including tote bags, stash bags, headbands, bandannas, aprons and T-shirt quilts. She loves pretty damask and floral fabric, but also fun, retro fabrics as well. Whenever she can, she tries to upcycle fabrics into practical items, such as sweatshirt totes, T-shirt quilts and rugs.

Today she shares a tutorial on how to upcycle a coffee sack bag into a unique rug. Click the link to visit the tutorial. Enjoy!

Kamis, 03 Maret 2011

Food: Thai Chile Beef

One of my fave TV shows is America's Test Kitchen (on PBS, so you don't have to have cable to see it!), so when the little infomercial about their complete 2001-2011 Cookbook and dvd set came on... yes, please! The cookbook is packed with all of their fabulous recipes from the past 10 years, complete with pictures and "Why this recipe works" for each recipe. Fabulous.

I've been through it several times, writing down "to-make" recipes. We've had tons of amazing friends bringing us a meal every other day, so it's been great to ease back into cooking (read: was not cooking at.all. before and right after baby came). One recipe we tried last night was Thai Chile Beef (we LOVE Thai food). It turned out fabulous. Fabulous.

It called for a lot of ingredients I didn't have on hand like fish sauce, ground white pepper, serrano chiles, and Asian chili-garlic paste. We decided that it was worth the "investment" of purchasing these ingredients since they all last awhile (except the chiles) and we have a bunch more recipes for Thai food.

I had to tone down the heat (chiles and garlic) on my portion- so as not to hurt baby, but we all loved the dish in the end. Definitely a keeper.
Thai Chile Beef
Sauce
2 tbsp. fish sauce
2 tbsp. rice vinegar (didn't have this on hand, used 1 tbsp. apple cider vinegar and 1 tbsp. lime juice)
2 tbsp. water
1 tbsp. light brown sugar
1 tbsp. Asian chili-garlic paste

Beef and Vegetables
2 lbs. blade steak, halved lengthwise, trimmed and sliced into 1/8 inch thick slices (I used 1-3/4 lb. flank steak and it worked wonderfully)
1 tbsp. fish sauce
1 tsp. light brown sugar
3/4 tsp. ground coriander
1/8 tsp. ground white pepper
3 tbsp. peanut or vegetable oil (I used canola)
3 medium galric cloves, minced or pressed through a garlic press (about 1 tbsp.)
3 serrano or jalapeno chiles, halved, seeds and ribs removed, chiles sliced thin (I only used 2)
3 medium shallots, ends trimmed, peeled and quartered lengthwise, layers separated
1/2 cup fresh mint leaves, large leaves torn into bite-sized pieces (left this out)
1/2 cup fresh cilantro leaves (left this out too, hubby doesn't care for cilantro unless it's a Mexican dish)
1/3 cup unsalted roasted peanuts, chopped coarse
Lime wedges, for serving
1. For the sauce: Combine all the ingredients in a small bowl and set aside.
2. For the beef and vegetables: Toss the beef with the fish sauce, sugar, coriander and white pepper in a medium bowl and let marinate for at least 10 minutes or up to 1 hour. In a small bowl, mix 1 tsp. of the oil and garlic together.
3. Heat 2 tsp. more oil in a 12-inch nonstick skillet over high heat until just smoking. Add one-third of the beef, break up any clumps, then cook without stirring until the meat is browned at the edges, about 1 minute. Stir the beef and continue to cook until cooked through, about 1 minute longer. Transfer the beef to a clean bowl and cover with foil to keep warm. Repeat with 4 tsp. more oil and the remaining beef in two batches.
4. Add the remaining 2 tsp. of oil to the skillet and return to medium heat until shimmering. Add the chiles and shallots and cook until beginning to soften, 3 to 4 minutes. Clear the center of the skillet, add the garlic mixture, and cook, mashing the mixture into the pan until fragrant, 15-20 seconds. Stir the garlic mixture into the shallots and chiles.
5. Stir in the beef with any accumulated juices. Whisk the sauce to recombine, then add to the skillet and cook, tossing constantly, until the sauce is thickened, about 30 seconds. Stir in the half of the mint and half of the cilantro. Transfer to a serving platter, sprinkle with the remaining cilantro and peanuts, and serve with lime wedges.

Selasa, 01 Maret 2011

DIY Pinwheel Mobile: Guest Post

Hello friends! It’s Alie visiting from decembertwentieth. I have been married for two years now to the love of my life and have a 3-month old baby boy. I do freelance graphic design work here and there but mostly get to spend all day being the best mom I can be to little baby Jack. I’ll be filling in for Ashley today with a fun DIY for you guys - a DIY Pinwheel Mobile (Click the link to see the tutorial on my blog). I made this mobile to go in my son's nursery, but this could also be used in an older child's room or play area, a craft or workspace, or perhaps somewhere else in your home. Enjoy!